async defer src="//assets.pinterest.com/js/pinit.js" My Enchanting Cottage Garden: April 2014

Tuesday, April 29, 2014

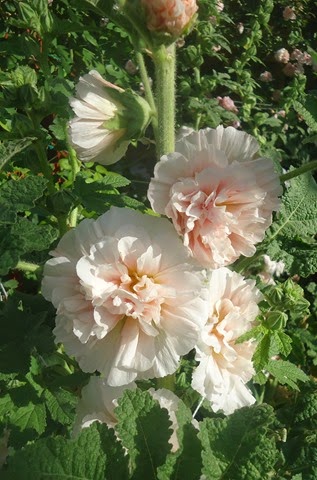
Why Your Garden Needs Hollyhocks


With spring already firmly established and seed planting and sowing already started, I thought this would be the perfect time to extol the virtues of the Hollyhock. Hollyhocks were a typical plant that could be found growing in most any Victorian-era garden. Whether you're planning a formal garden reminiscent of the Victorian age, an old-fashioned cottage garden, or something entirely different, I suggest you consider planting some Hollyhocks. Hollyhocks have many positive attributes including:


  • Hollyhocks add a beautiful splash of color and vertical dimension to any bord
  • Spectacular showy blooms
  • Hollyhocks ability to readily reseed themselves allow them to perform like a perennial
  • They are able to tolerate heat well.
  • If you have a hot sunny spot other plants can't tolerate, try planting some Hollyhocks.
  • Hollyhocks are a favorite of the Hummingbird
  • The Hollyhocks height makes it an excellent screen for fences and other unsightly garden features
  • Hollyhocks are a biennial plant, meaning that their lifespan is about 2 years. They will grow foliage in the first year and bloom in the second year. Hollyhocks will readily reseed themselves, so once you get your planting established they require minimal upkeep.


    The Best Location To Plant Your Hollyhocks

    There are two things to consider when choosing a location to plant your Hollyhocks:

      1. For the most spectacular blooms, you plant your Hollyhocks in full sun. They will tolerate a slight amount of shade, Hollyhocks growing in dappled sunlight may not grow as tall, however, the blooms often last a little longer.
      2. Hollyhocks will not thrive in heavy compacted soil. They grow their best in the soil which is rich and well drained.

    When To Plant Hollyhocks 

    When Planting Hollyhocks From Seed
    The most common recommendation is to plant your Hollyhock seeds in the fall, this allows the root system to get established over the winter months. Hollyhocks planted in the fall have a chance of blooming following summer.
    If you are unable to get your seeds sown in the fall to have no fear Hollyhock seeds can be planted spring too. In the spring plant your seeds as soon as you can work up the soil. When planted in the spring Hollyhocks will produce foliage, but will not bloom until the following summer.


    When Planting Hollyhock Seedlings

Hollyhock seedlings should be planted in the spring after the last frost. If you start your own seedlings,

they should be gradually acclimated to their new surroundings over the course of 10 to 15 days.


    How To Plant Hollyhock Seeds

    Plant Hollyhock Seed Spring or Fall As Follows:
    1. Prepare the bed for planting, by working it up thoroughly.
    2. Add a healthy amount of compost, because Hollyhocks love their soil rich.
    3. Spread the seeds over the surface of the planting bed.
    4. Cover lightly with soil, no more than 1/4 of an inch. (If Hollyhock seeds are planted too deeply they will not germinate.)
    5. Water thoroughly.


    Planting Hollyhocks In The Spring
    Once the seeds have germinated and the plants begin to sprout you may need to thin them out a bit. Simply pluck out any tightly clustered sprouts, leaving approximately 18" between the remaining plants. Keeping ample space between your plants, allows for ample air flow and helps to reduce their susceptibility to rust.
    Planting Hollyhocks In The Fall
    Trim back any foliage at first frost. Mulch well, especially if you live in an area with severe winters. Remove the mulch in the spring and thin as described above.

     Hollyhock Care And Maintenance

    In the spring you can top dress your Hollyhock bed with composted manure or any other rich compost. This will promote rigorous growth. 
    • Hollyhocks need plenty of water to bloom well, but not too much. I water mine twice a week during the summer months. Always water at the base of the plant. Keeping your plants well watered and watering at the base helps to prevent rust.
    • If your Hollyhocks are located in a windy area, or you find that they are leaning due to their size, use stakes to help support them.
    • Deadheading your Hollyhocks will prolong blooming. Deadheading is simply removing faded flowers before they have a chance to form seed pods.
    To promote self reseeding allow some of the flowers to form seed pods towards the end of the season. As the seed pods dry out they will burst open, scattering the seed that will give rise to the next generation of Hollyhocks. This is also the time to collect seed if you are planning to start another planting.
    In the late fall cut back all of that seasons foliage. Apply some bone meal to give the root system a boost over the winter and mulch well 

    Hollyhock Rust is caused by a fungus called Puccinia malvacearum. The symptoms of Hollyhock Rust first present as rusty orange spot on the underside of the leaves. As the fungus progresses you will begin to see brighter orange spots on the tops of the leaves. Eventually the spot will grow and turn a dark brown color. Left untreated Rust may cause the loss of foliage.


    Preventing And Treating Hollyhock Rust

    Here Are 5 Easy Tips To Prevent And Treat Hollyhock Rust:
    • Frequently checking your plants during the growing season, will allow you to quickly remove any infected foliage at the first sign a rust infection. This should help slow any further spread of the fungus.
    • Keeping water off the foliage when watering and good air flow around the plants also helps to prevent rust.
    • Keep your beds weeded to eliminate other common hosts of rust like Round Leaved Mallow.
    You can use fungicide to prevent rust. Rust pops up in the spring and persists through the rainy season. To completely control rust fungicide will need to be applied at 10 to 14 day intervals throughout the rainy season. Apply fungicide only to the foliage and the stems, always according to the manufacturers recommendation.
    At the end of the growing season always remove and dispose of any infected plants and plant materials. This will help limit the number of rust spores that survive the winter. Do Not put infected plants into your compost pile. Infected material should be burned, or sealed in a plastic bag and taken to the landfill.


    Enter your email address:


    Delivered by FeedBurner

Thursday, April 24, 2014

The Rambling Rose Worth Growing

This beautiful rambler is named "Veilchenblau" which means "violet-blue" in German is a deep purple crimson, producing large, closely packed clusters of small cupped flowers the buds open to a beautiful and unusual mix of colors. They open dark magenta with a white center and are occasionally streaked white - with an attractive boss of bright yellow stamens. As the blooms age, they turn dark violet, finally fading to lilac-grey. Can appear almost blue on occasions.

A vigorous rambler of typical multiflorous characteristics.  The foliage is light green and the growth almost thornless. There is a fresh, fruity scent, often with rich orange notes. It has a stiff growth, with many strong stems shooting from the base of the plant. A position in a partial shade often creates the richest coloring. Ideal for walls, pillars, and pergolas.

This is a rose that I will always have in my garden, no matter where I live. Whenever I move into a new home the first rose order I send out will invariably include Veilchenblau and even though this beautiful rambler only produces flowers once a year, it is still worth having just to view it’s opulent show each spring.  Below you will find my pictures of Veilchenblaus' blooms.


veilchenblau rambling rose
veilchenblau rose 2

DSC02582

DSC02567-001

        DSC02570

Sunday, April 13, 2014

The 5 Must Have Plants For Romantics


forget me not   Gardens and flowers have always inspired    passion,   remember the scene in “A Room with a View”  a magical field of flowers got Lucy a spontaneous kiss from George.  So it is natural that the garden would become populated with romantic little characters who would enhance matters of the heart. What could be more romantic than being caressed on the forehead by “kiss me over the garden gate”. Think of all the bouquets carried to the altar in a hand that will soon gain a ring. Not surprisingly, many folklore rich plants with deep roots have earned lusty names. Some denote yearning: love-ache; and bleeding heart; while some suggest disappointment: cast me down; love lies bleeding. But most of all, flowers capture the sheer rapture of infatuation and Forget Me Not's                                                    all that follows: come and cuddle me; kiss me quick and go; say it all.  Next time you go into the garden with a special someone there just might be a happy ending for your loudly beating romantic heart.

Love in a Mist
love in a midst
Once you see Nigella in bloom, you will always recognize it by its unique mist of airy bracts and foliage. The foliage is ferny, the flowers are fluffy and the seed pods are intriguing. Best known for the vivid blue blossom variety, Nigella also blooms in purples, pinks and white.

Kiss Me Over The Garden Gate
kiss me over the garden gate 1
Kiss-me-over-me-garden-gate is a beautiful old-fashioned flower that unfortunately is not often seen in private or public gardens.It is a prolific grower, which makes it an excellent choice to use as a unique privacy screen to your deck or patio. You just need to make sure you plant it in large containers. It also provides lots of shade. Because it grows tall and bushy, it is a good choice to plant near a trellis, even though it is not a climbing plant. It makes a great addition to a butterfly garden, and the color helps attract hummingbirds. It is excellent plant to use in cut or dried flower arrangements.

Love Lies Bleeding
Love%20Lies%20Bleeding_874x768
Love Lies Bleeding is an annual, passing from seed to maturity in a single season in all but the very warmest of climates (zones 10-11).  It is relatively easy to grow from seed, and it self-seeds prolifically, to the point that it has been labeled invasive or noxious in certain parts of the world. In affairs of the heart, we can all use a little support from our friends, and Love Lies Bleeding is no exception. There are quite a few different cultivars that fall under the umbrella of amaranthus caudatus, with varying colors, forms, and sizes, but nearly all require some sort of staking or support once the long, flowing flowers begin to form. A few are upright, but even those might benefit from a little support if they are subjected to winds. 

Cupid’s Dart
cupids dart
A favorite of flower arrangers, the papery, bright blue dandelion-shaped blossoms are excellent for cutting, fresh or dried. Plants form a low clump of narrow grey-green leaves, the flowers appearing on upright stems in summer. Remove faded blooms to encourage more buds to form. Short-lived, but will often self sow. Choose a bright, sunny site with better than average drainage. Drought tolerant, once established. In the ancient language of flowers, Cupid's Dart symbolizes love.

Bleeding Heart
bleeding heart Bleeding heart has attractive mounded foliage with arching stems of delicate, heart-shaped flowers in spring. It thrives in moist woodland gardens along with ferns and other shade-lovers. Bleeding heart grows best in cool, moist conditions. Flower colors include yellow, pink, red, and white. It blooms in spring and may re-bloom sporadically throughout the summer in cool areas. Height ranges from 6 inches to 2 feet, depending on variety. It’s a fountain of heart blooms that sway in warm breezes. The blooms are fragile yet the plant is hardy and comes back year after year, no matter how harsh or bitter the winter.


Thursday, April 10, 2014

5 Steps to the Perfect Garden Party

DSC02504
The Perfect Garden need not be a tedious affair, it can be as simple as baking some scones and prepping the blooming garden.  My Garden party consisted of inviting the right people, having the roses blooming and finishing all my yard art and installing in the garden.  I have listed my 5 steps to a perfect spring garden party and it works for me every time.


DSC02503

Step 1.  Enlist the help of 2 very good friends or family member s to help with the palns and preparation.  Planning even a small party can be daunting, you would be surprised how easy a party can be when you enlist the help of two more people.  When I plan a party I always ask my daughter in law, she has so many good ideas and she helps prepare the food and stays to clean up afterwards, this is very important.
 
DSC02505 
Step two is to invite your special friends who enjoy and appreciate flowers, gardens and of course the Holy Sanction of "Tea Time"


 DSC02500

Step three is to prep the garden for the maximum bloom time and install all your new yard art. Guests seem to really enjoy these special pieces and there is absolutely no substitute for blooming roses and plants.  This is an added element of your garden party that cannot be substituted.


DSC02509

Step Four to your Garden Party is really good "Tea Food" and a good quality tea.  This is essential for any party but for a tea party you should serve traditional scones, petite fours, cucumber sandwiches and a very good quality tea.


. DSC02511
Step Five could be optional, but I think it is a nice touch and that is giving a favor to each guest.  My daughter in law always makes the favors and includes in the bag a special tea bag and an assortments of other goodies.  Guest feel special and honored and this is your thank you for your guest coming to the afternoon garden tea party. 
.      
DSC02514    


 DSC02515
DSC02524   DSC02522   DSC02529
DSC02534     DSC02556  DSC02561
DSC02560    DSC02566